In the last few posts on the Lighting 101 blog, David Hobby introduced the interesting practice of reverse-engineering lighting. He prompts the reader to diagnose the key ight by determining location of the light (revealed by the directions of the shadows and how fast it falls off--fast falloff=close), whether the light is hard or soft (hard transitions between highlights and shadows=harder light source), and the ratio of flash vs ambient (approximated from the contrast of shadows vs that of lit areas).
The concepts I see when reverse-engineering other people's photos apply to taking my own photos. Pre-visualization is a big part of getting a desired shot. Before I take a photo, I have to look for where my light will fall and what reflections there will be. Figuring these things out is as simple as eyeballing the scene from the speedlite's location.
Hobby also introduces a shorthand way to describe how a photo was lit. Instead of writing out the step-by-step instructions of what he did, all he really needs to mention is the relationship between flash exposure and ambient exposure.
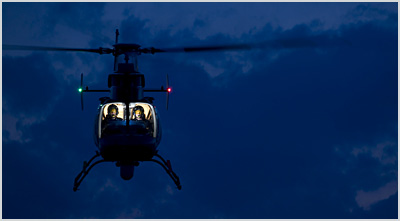 Photo by David Hobby
 For example, all he needs to say to describe this photo is "Exposed for flashes in chopper -- one in front cabin, two in back -- and dropped the ambient by three stops."
I found this shorthand to be amazingly simple yet effective. The concept of ignoring what the camera settings (aperture, shutter speed, ISO) in favor of the relative settings seemed strange at first, but makes more sense because knowing the exact settings are not important to lighting.
This wraps up Lighting 101, which introduced the beginning elements to strobism. Up next is Lighting 102, which is more in-depth and provides better understanding of ighting.
Total Time: 30min.
 RSS Feed